Haunted Mansion Facade
Friday, September 22, 2017
Thursday, September 21, 2017
Wednesday, September 20, 2017
The Preview
Now that the decor and electrical is complete, it's time to show it all together "lights on"- at least in my garage. The final posts will have it installed in the doorway and/or window.
All Decorated Up
As stated before, I purchased two different photos to hang on the wall. For budget purposes I had to suffice with commercial Halloween decor. Also, perhaps I just needed to get over the whole fully realistic decor I had planned. It is supposed to be fun right? The lit canvas is definitely fun and as I said I purchased it from Cracker Barrel Old Country Store. The lenticular portrait of the children is for sale from many vendors across eBay. This may be particularly too frightening for little ones.
Now to enhance the sceni. I decided to use an old sewing table to display period or period looking pieces. The wall looked a little plain without anything in front of it. Here are the items I gathered.
The metal horse, silver platter with cups and green felt photo frame came from the local good will for practically nothing. An antique photo album book antique is stacked atop a vintage math book, both of which are from a local antique store. The bronze candle holder came from the same store. The photo in the frame is from the album on the table. Lastly, a somewhat corny "Antique" radio prop from Lowes. It was just too fun to resist. It livens the scene up when it plays some "dark" symphony music. It also has an animated skull that illuminates a random color upon each play. It can either be tripped by motion or set to play continually.
Electrical
So I'm not going to discuss specific electrical wiring and diagrams. I am not a formally trained electrician but I have years of experience in microelectronics hobbies as well as DIY projects at home. It may be a liability issue to go into specifics. What I can say is that I wired each light to a separate switch and that switch is connected to a standard lamp cord with a polarized plug. The back will be covered with similar plywood used in the front for safety with an access panel.
Tuesday, September 19, 2017
Lights, trim, action...
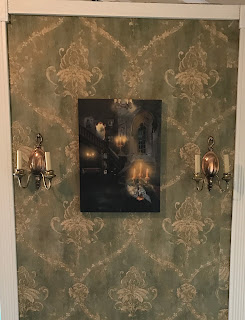
At this point I undertook mounting the sconces as planned and practiced. I scored the paper in a cross shape for the wiring whole and simply used a drill bit to poke open the two zip-tie holes. They both went on as planned. I definitely needed a win after my wallpaper defeat.
Now, on to the trim. I decided not only to add molding to the sides but also to the top. A rosette/corner block would make installation and cuts easier by eliminating having to miter. I cut some of the trim and made sure it fit well. At this point you will notice I had already installed the top (chair rail) and bottom (base board) molding.
I added a spooky photo to see how it all came together. The photo is pretty tacky but I couldn't resist. It is pretty fun. The canvas has build in LED's which make the prints candles/candelabras glow. You can even have it play sound and reach to motion. I found this at Cracker Barrel one Sunday a few weeks ago. I know, I know. I said I would leave the cheesy stuff out and go for something more classic. I looked at some 19th century portraits and even the reproductions were outrageously priced. So I had to make a compromise. I did however find a creepy 19th century plastic portrait reproduction of two toddlers that has a lenticular function to make the faces look evil from different vantage points. I'm not sure what one I will go with in the end. Most lightly the lit canvas because of the dark setting.
Subscribe to:
Comments (Atom)


